![]()
Click the logo to add
this site to your Favourites
Search:
Quick Links
Subscribe to my Newsletter
Books presented in association with:

Your Free E-Mail
Account:
Send me mail!
![]()
Making Stationery
Introduction
Creating Stationery
Style Sheets
FrontPage 98
FrontPage Express
Notepad
Arachnophilia
Adding a border
The next step
Compatibility: The information on this page applies to both Outlook Express 4 and Outlook Express 5
So, you want to make stationery do you? Well get ready, you're about to embark on an arduous journey. You need a degree in graphic design as well as excellent programming skills, and thousands of dollars in software . . .
Wait a minute - it seems my evil side took over as I typed that sentence because you don't need any of that. With a bit of time, a text editor, and some instructions from a helpful website - you too can make beautiful stationery. ... starting to sound like an infomercial here ...
Without any further ado...
At it's heart, stationery is a small HTML file that loads a background image.
<html>
<head></head>
<body background="some image.file">
</body>
</html>
This is all you need for completely useable stationery. In a graphical HTML editor, such as FrontPage Express or FrontPage 98 it is even easier. Start a new page. Format | Background, browse to the file you want to use, click OK twice and save. Voila - stationery. Note, when doing this in Notepad, be sure to include the full path to the graphic of your choice. If you've downloaded Arachnophilia and my toolbars for it, then creating simple stationery is even easier. Merely click the Basic button - that'll prompt you for a graphic and write the HTML for you.
As I said, that makes for completely useable stationery. Depending on the background image you choose that can either be a rather boring plain background or an exciting piece of electronic art - it all depends on the graphic.
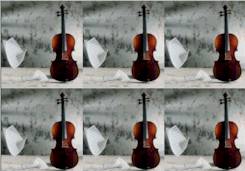
 When you select a
graphic as a background it will automatically tile (repeat itself to fill the page), but
what do you do if the graphic you choose is not a good candidate for tiling? Imagine
I want to use the graphic at right for stationery. If I were to just use the method
described above, my stationery would probably look awful as that graphic would not tile
very well. Also when designing stationery you must keep in mind how text will look
against the background you choose. Against the background at right, text will be
difficult to read.
When you select a
graphic as a background it will automatically tile (repeat itself to fill the page), but
what do you do if the graphic you choose is not a good candidate for tiling? Imagine
I want to use the graphic at right for stationery. If I were to just use the method
described above, my stationery would probably look awful as that graphic would not tile
very well. Also when designing stationery you must keep in mind how text will look
against the background you choose. Against the background at right, text will be
difficult to read.
 So, since this graphic will not
look good when tiled across the screen (see example at left), does that mean you should
give up - not at all, it is quite easy to change a background so that it does not tile
itself all over the screen.
So, since this graphic will not
look good when tiled across the screen (see example at left), does that mean you should
give up - not at all, it is quite easy to change a background so that it does not tile
itself all over the screen.
What you need to do is add a style sheet so that the graphic knows not to repeat itself at all, or to only repeat itself in the direction you wish.
As I just mentioned, the Style sheet can be used to control how the background image will display in stationery. It can also control many other important items of stationery: Margins, fonts, etc.
There are two basic methods of implementing style sheets in stationery. There is the "inline" style in which the style information is entered in the HTML tag it affects:
<head></head>
<body background="some graphic.file"
style="background-repeat: repeat-y" bgcolor="#FFFFFF">
As you can see in the example above, the style has been added directly to the HTML tag.
There is also the Style Sheet, or "Block Level" style. In that case, the style information is added in a Style "block" at the Head section of the document.
<head>
<style>
body {
background-repeat: repeat-y;
background-color: #FFFFFF;
}
</style>
</head>
<body
background="some graphic.file">
This example does exactly the same thing as the inline style example.
So what's the difference? Aside from the location, there isn't much. However, the one difference there is, is an important one. If you use the Outlook Express feature "Save as Stationery" it will save a "Block Level" style and not an "inline" style.
What this means to you is if you find a stationery you like somewhere and wish to save it, if it has been coded with "inline" styles it will not save properly. All you will get is the background image and nothing else, when you want to use it, the margins, all tiling information, and even the background colour will be gone. However, that same stationery, if coded with "Block" styles will save properly.
This doesn't mean that Save as Stationery will save everything - that option still has some serious limitations, but when "block" styles are used, the Save as Stationery option at least does something. Be sure to read my page on Saving Stationery for further information on this option.
That being the case, you're probably wondering why anyone would ever use an inline style. Well, the inline method is easier to code, and when looking at the code, you can see immediately how an element will appear. It is worth the effort to learn the "block" styles, however as they are ultimately more powerful and more useful.
So, how do you make one of these Block stylesheets? As you have probably surmised, that depends on the program you are using to create your HTML.
If you're lucky enough to have a copy of FrontPage 98, then creating a block style is a walk in the park for you. Simply go to Format | Stylesheet. A window will appear that has the following code in it:
<style>
<!--
-->
</style>
Position your cursor immediately after the <!-- then press the Style button at the bottom of the window. A new dialog box will appear that has many tabs and options. I recommend playing with these options for a while as there are many of them. Try them out and see what they do. The most commonly used ones for stationery will be covered below.
When you've picked a few options and pressed OK, you are returned to the first widow (the one with that little snippet of code. The code for the options you have chosen have been added. You'll notice the the code now reads:
<style>
<!-- {style options here}
-->
</style>
Before you press okay, there is one final thing to do. You have to indicate to FP98 what element of your HTML this style is for. You can assign this style to many different elements in your HTML, in the case of stationery, 98% of the time you will wish to indicate that this style is to affect the entire body of the document. You indicate this by adding the element name to the style code immediately before the {style options here} part. When finished, your style sheet will look like this:
<style>
<!-- body {style options here}
-->
</style>.
Press the Okay button and FP98 will automatically add your style to the current HTML document. Please be aware that because of the way these graphical HTML editors work, the style may not display properly in the editing view. Preview your document to see it as it will display.
On the other hand if you're using FrontPage Express - just give up now. You can not use FPE to write a block level style sheet, unless you're willing to switch into it's excuse for an HTML view and type it there (assuming you know the code). Furthermore, since FPE has a predilection for altering perfectly valid code, if you don't enter the style in exactly the way it thinks it should be, it will change your code on you.
This really stupefies me and makes me wonder if the various program teams at Microsoft ever talk to each other, and just where were the project supervisors? Let's see, both Outlook Express and FrontPage Express come bundled with Internet Explorer 4. OE needs a style to be in a certain format to save it properly, and yet FPE is incapable of producing this.
Of course, you can use FPE to create an inline style. You're probably thinking: "well it's not as good as a block style, but it's good enough." Wrong. In any other program I might agree with you, but not FPE. You see, even creating an inline style in FPE is a tedious process which requires you to know the codes and to go through 4 or 5 different dialog boxes to even get to the one where you can add this style. Considering the limitations of inline styles discussed above, it isn't worth the effort. Even my "toolbars" for FPE can do nothing about this limitation.
My advice if you're using FPE? Switch to a different program. In the long run you'll find it much easier. If you insist on using FPE - create your stationery, then save and re-open the file in a program like Notepad and enter the style there. You'd need to manually enter the style in FPE anyway, and Notepad has a friendlier interface and is more forgiving.
In Notepad you have to type the style information yourself, but as there are only a couple things that you really need to know for stationery, you'll quickly memorize them [see below]. When entering the style into your HTML document, be sure to put it in the Head section (between the <head> and </head> tags).
Finally, users of Arachnophilia and my Custom Toolbars have it easy. When creating stationery in Arach, the <style> tags will be written for you. All you need to do is fill them in. This can be accomplished by right-clicking and picking the appropriate item off the context menu. See the instructions for my Arach toolbars for more details.
Oh yes, before I went on that Style Sheet digression, we were about to fix our image so that it would not tile all over the place. We wanted to make it into a left border stationery.
Depending on the program you're using, the exact method will vary. In FP98 you pick the repeat-y option off the repeat pick list on the colours tab of the stylesheet editor. In Arach, you pick Border (left) off the context menu and in FPE or Notepad you type it yourself. However you get there, the style should look like this:
<head>
<style>
body {
background-repeat: repeat-y;
background-color: #FFFFFF;
}
</style>
</head>
<body
background="some graphic.file">
The background-repeat: repeat-y lets your program (in this case Outlook Express) know that the image should only repeat itself down the y-axis, (up and down the left margin of the page). When setting this attribute, you can also choose to set the background-repeat to repeat-x or no-repeat to cause the image to tile across the top or not to tile at all, respectively.
Pay attention to the background-color item. When using either FP98 or FPE it is ridiculously easy to set the background colour of the document - on the same dialog box where you choose your background picture, you can also set a background colour from the pick list. However, this approach renders the background colour "inline". As with the other style items when someone tries to save your stationery this inline colour specification is lost. Instead in FP98 the background colour should be set via the stylesheet editor (on the Colours tab). Unfortunately you can't do this in FPE so you might as well use the inline colour there.
However you set your colour, you'll notice that the code for the colour itself doesn't make much sense - it appears as a weird looking code. The "#FFFFFF" shown in the examples above is a hexadecimal code that sets the background colour of the window to white, thus any part of the window that is not covered by the graphic will be white. This is useful to ensure that your stationery appears as intended for people who have a non-white default colour. Of course you don't have to worry about the code in a program like Front Page Express or FP98, just pick the colour off the pick list and the program will automatically fill it in. In Arach, you are prompted to pick a colour. If you're using Notepad, you can use my Colour Preview Utility to learn the colour codes if you don't already know them.
One thing to keep in mind; if you go against all advice and reason and enter the style using FPE please be aware that even though you may have set the repeat option, in the main FPE window, your background will still seem to be tiled all over the screen. This is just an oddity of the way that program works. If you have set it correctly, it will display properly in Outlook Express.
 As you can see, by merely
setting the repeat option and the background colour, we now have far more attractive
stationery. With a bit of finesse using a Graphics Editing Program we could turn
this image into a true work of art, but that is beyond the scope of this page.
As you can see, by merely
setting the repeat option and the background colour, we now have far more attractive
stationery. With a bit of finesse using a Graphics Editing Program we could turn
this image into a true work of art, but that is beyond the scope of this page.
Next, there is another option I wish to introduce to you here. A nice, "professional" looking effect to use with stationery is when the background image remains motionless, and the text alone moves when you scroll within a message. I hope that explanation is clear because there is no way I can demonstrate with a screen shot. For a mental picture of this effect, imagine the credits at the end of a movie. The picture remains still and the text scrolls over it. Of course, the text does not scroll by itself, but you get the picture - hopefully. In stationery circles this effect is known as a "watermark".
Setting this option can be a bit confusing. You'll no doubt notice that both FPE and FP98 include a handy Watermark check box on the screen where you pick your background image. Although this option will work - don't use it. You're probably wondering why? Well, once again, that would create this option as an inline style option and thus it won't get saved along with your stationery if people use the Save As... option. If you're going through all the bother of learning to create stationery you might as well create it in such a way that people who see and like it can save it...
So, we need to find a way to duplicate this effect as a block level style option. Don't worry, it's easy. If you're using FP98, simply pick the Fixed option off the Attachment pick list on the Colours tab of the style dialog. In Arach, you have merely to pick Watermark off the Context menu. If you're using FPE or Notepad, you'll have to type: background-attachment: fixed; into the style section.
However you get there, our code now looks like this:
<html>
<head>
<style>
body {
background-repeat: repeat-y;
background-color: #FFFFFF;
background-attachment: fixed;
}
</style>
</head>
<body
background="some graphic.file">
</body>
</html>
To recap, that code will set the background image of your stationery to your chosen file. It will only tile down the left hand border leaving the rest of the page white. If this stationery is used to compose a long message, when the recipient scrolls through the message, the graphics will remain stationary (get it?) while the text moves.
Finally, there is one more thing you need to know to make stationery - margins. If you do not set a margin, when you type on your stationery, the text will go over the graphics - not a desirable result. So how does one set a margin? Once again, it's easy. You guessed it, this is yet another attribute that needs to be added to our style section.
In FP98, simply type a value into the "Left" text area on the Alignment tab of the stylesheet dialog box. In Arach, pick Margin (left) off the Right-Click Menu. In FPE or Notepad, once again you'll have to enter it manually.
The code looks like this: margin-left: 170; "170" represents the number of pixels in from left side of the window that the text and cursor will appear. Of course the exact number of pixels will vary depending on the graphic used and your own taste. Setting this is a matter of trial and error. If you know how wide your graphic is to begin with then it becomes much easier.
You FP98 and FPE users may be saying "Hold on a minute. What about the margins tab on the page properties dialog?" Well, once again that option does work but it will be created as another inline option so it won't get saved by OE. You're best to add this to our Style block.
The code for the whole stationery that we just made will look like this:
<html>
<head>
<style>
body {
background-repeat: repeat-y;
background-color: #FFFFFF;
background-attachment: fixed;
margin-left: 170;
}
</style>
</head>
<body
background="some graphic.file">
</body>
</html>
As you can see, stationery is ridiculously easy to do and can produce some stunning work. If you've never dabbled in code before and don't have a program like FP98 then give it a try. I promise you won't be forced to wear a pocket protector or put tape on your glasses, hand coding stationery is just not that dangerous...
If the idea of writing the code yourself seems foreign to you then I heartily recommend Arachnophilia and my custom toolbars. Since it is a code based interface, you're working with the code itself and you can't help but learn some HTML as you go along; but as it writes the code for you, you don't have to worry about memorizing all these obscure tags and stuff. Just hit the proper button and it will create the code for you.
No matter how you got there - congratulations, you've just made stationery.
Now, you've designed this lovely stationery, now what. Well as you might imagine, you need to save it before you can use it. Saving is fairly straight forward, just ensure that you save it under a name you'll recognize and in a folder you'll be able to find again. If you've been working in Notepad, ensure that you save the file as an htm file. Notepad's default file extension is txt, so you'll need to specify the htm extension to have it saved properly.
The instructions above have familiarized you with some of the basic techniques in making stationery. You can make perfectly good stationery with just those instructions, and many people will be satisfied with that. However there is a lot more that can be done with stationery. On the pages that follow I will attempt to familiarize you with some of the most popular effects employed by stationery creators.