![]()
Click the logo to add
this site to your Favourites
Search:
Quick Links
Subscribe to my Newsletter
Books presented in association with:

Your Free E-Mail
Account:
Send me mail!
![]()
Top Borders
If you read the page on Making Stationery, then you already know how to use a style
sheet to make a left border for your stationery. One thing I briefly mentioned on
that page deserves more attention.
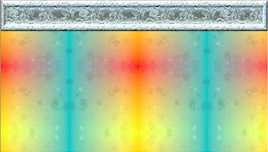 When
creating stationery, making your image into a top border (see example at right) seems to
be a natural idea, and it is actually quite easy to do. Simply inserting the following
code will create a top border in your stationery:
When
creating stationery, making your image into a top border (see example at right) seems to
be a natural idea, and it is actually quite easy to do. Simply inserting the following
code will create a top border in your stationery:
<HEAD>
<style>
body {
background-repeat: repeat-x;
}
</style>
</HEAD>
Unfortunately, top borders created in this manner have some limitations. If you write a long message on this stationery, as the reader scrolls through the message, the border image scrolls away and you can no longer see it. That's no good - you spent all this time making your stationery you want to make sure that people can see it.
If you've been paying attention to my other pages, you're probably thinking: "Just watermark the image to hold it in place". Well, you're right. Adding a watermark to your style section:
<HEAD>
<style>
body {
background-repeat: repeat-x;
background-attachment: fixed;
}
</style>
</HEAD>
does keep the image in place so that it is always visible. But this method also has drawbacks. When you do this, although the image stays in place, as the reader scrolls through your message, the text scrolls over the border image. This is no good because the text becomes hard to read, the image gets obscured and the whole thing just looks sloppy.
The challenge, therefore, is to make a top border image that remains in place as you scroll through the message, and to make the text go under the image as you scroll.
Thus, I came up with a script that causes your top border to remain in place as you scroll through a message, and the text scrolls under the image. As well, it also causes the border image to automatically resize itself to fit the size of the window.
The Script:
<IMG border=0 id=topBorder src="YOUR BORDER IMAGE HERE" style="LEFT: 0px; POSITION: absolute; TOP: 0px; Z-INDEX: 99">
<SCRIPT language=VBScript>
sub borderTop()
topBorder.style.posTop = document.body.scrollTop
end sub
sub borderSize()
topBorder.style.width=document.body.clientwidth
topBorder.style.visibility = "visible"
end sub
sub Window_OnResize()
borderSize
end sub
sub Window_OnScroll()
borderTop
end sub
SetTimeOut"borderSize",2000
</SCRIPT>
Okay, so I've shown you the script, now what the heck do you do? The script shown above is indented to increase it's readability - as such it is intended "for display purposes only". To get a fully functional copy of the script for your use, click here to download a script "template".
The zip file you just downloaded contains a single file - topborderscript.txt. Unzip this file somewhere and open it with Notepad or your favourite text editor. Select the entire script and paste it into the HTML document that you wish to embed sound into.
If you use a graphical HTML editor - to use that script and have it work, it must be pasted into the HTML view of your editor. If you paste it into the regular view of such a program it will not work.
Congratulations, you now have the top border script added to your stationery. However, if you've been paying attention, you'll know that if we tried to use this script as-is it doesn't yet reference any graphics file, it needs to be told the name and path of a graphic file that is actually on your system.
Find the line with the <img> tag and replace the "YOUR BORDER IMAGE HERE" in the src attribute with the path and filename of a graphics file actually on your system.
Of course, users of my various toolbars have it considerably easier as this script is included in all three.
There are a few things you should be aware of when you use this. For starters, the top border image is loaded by that <img> tag, not the <body background="image"> code that you may be used to. If you do load your border into the <body> tag then this script won't actually do anything.
Simply because of the way this script works, you can not compose your background image so that the background and the border are only one image. For this script to work, the background and the border must be separate images. The background is loaded the regular way with the <body> tag.
As I mentioned above, this script causes the image to automatically resize itself. While it resized itself proportionally, it is still best to avoid using a realistic picture because the image could become distorted, instead use this with an abstract or non-representational image.