![]()
Click the logo to add
this site to your Favourites
Search:
Quick Links
Subscribe to my Newsletter
Books presented in association with:

Your Free E-Mail
Account:
Send me mail!
![]()
Basic Stationery
Using Paint Shop Pro
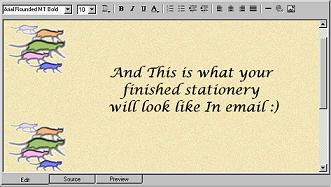
While there are many possibilities for arranging images in stationery. One style is used the most frequently: a left border image used over a coloured or textured background. When used, this basic stationery configuration somewhat resembles the background I used for this website, with the main attention getting image on the left and a plainer background on the right to make reading the text easy.
Many people when they are just beginning with stationery attempt to create this effect using HTML, loading more than one image in the <body> tag. This doesn't work and I receive a lot of mail asking how to add one image to another background.
 While
there are code based ways to achieve this, they are not particularly easy and tend to
result in less than satisfactory results. Therefore if you wish to create this type
of basic stationery is it best to compose the image properly in your image editor program,
such as Paint Shop Pro.
While
there are code based ways to achieve this, they are not particularly easy and tend to
result in less than satisfactory results. Therefore if you wish to create this type
of basic stationery is it best to compose the image properly in your image editor program,
such as Paint Shop Pro.
Before you can merge the two images into one, you first need to have the two
images to work with. It is usually best to start off with the background.
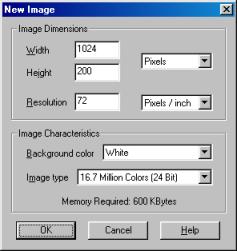
Open a new image (new image dialog displayed at right), ensuring the width is sufficient
to display properly at all screen resolutions, about 1024 pixels. The height of the
image will depend on the 2nd image you will be merging into it. A height of 200 to
400 pixels usually works well in stationery.
 Once
your background image is created, it's time to prepare it to become stationery. This
usually involves applying colour to texture to the image. Whatever you choose to do,
remember that the purpose of this image is to serve as a background for text, so don't
make it too bright or busy.
Once
your background image is created, it's time to prepare it to become stationery. This
usually involves applying colour to texture to the image. Whatever you choose to do,
remember that the purpose of this image is to serve as a background for text, so don't
make it too bright or busy.
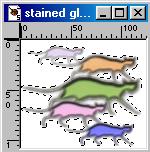
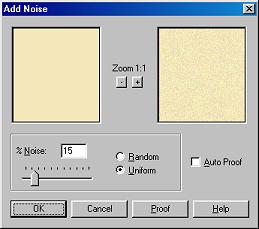 As you can
see by the screen shot, for this example the background was given a cream colour. To
make it a little more interesting, let's add a bit of noise. Go to Image |
Noise | Add. As you can see, in this example, we added 15% Uniform noise to the
background, but you are free to do whatever you wish.
As you can
see by the screen shot, for this example the background was given a cream colour. To
make it a little more interesting, let's add a bit of noise. Go to Image |
Noise | Add. As you can see, in this example, we added 15% Uniform noise to the
background, but you are free to do whatever you wish.
If you wish you could also easily add a texture to this background, for more information on textures, please see the Using Textures in Paint Shop Pro page.
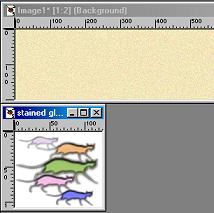 Once
your background image is complete, it is time to add in the second image. This is
the main image of the stationery - the one which gets all the attention, so it can be as
bright and colourful as you like.
Once
your background image is complete, it is time to add in the second image. This is
the main image of the stationery - the one which gets all the attention, so it can be as
bright and colourful as you like.
Open the image of your choice ensuring that it is in 16 million colour mode and that it is smaller in height than your background.
If either of these conditions are not true, you may change the colour mode by going to Colors | Increase Color Depth | 16 Million Colors (24 bit). If the image needs to be resized, go to Image | Resize.
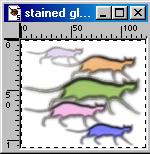 Once the
second image meets these requirements select it and then go to Selections | Select All.
Once the
second image meets these requirements select it and then go to Selections | Select All.
You will now see a selection outline (looks like little marching ants) around the outside
edge of the picture.
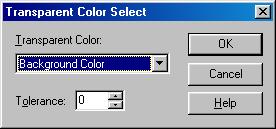 Since
you don't want the entire thing, but just the image itself, you need to get rid of the
white background. To do so, choose the Eyedropper tool and Right-Click on the white
background. Then use the Selections | Modify | Transparent Color, and the window shown at
right pop up. Set the Transparent Colour to Background Colour and the Tolerance to
zero.
Since
you don't want the entire thing, but just the image itself, you need to get rid of the
white background. To do so, choose the Eyedropper tool and Right-Click on the white
background. Then use the Selections | Modify | Transparent Color, and the window shown at
right pop up. Set the Transparent Colour to Background Colour and the Tolerance to
zero.
 Once
you click Ok the second image will now have the selection outline (marching ants) just
around the image itself and not the background.
Once
you click Ok the second image will now have the selection outline (marching ants) just
around the image itself and not the background.
 With
the image still selected go to Edit | Copy. Now select background image
and Edit | Paste | As New Selection.
With
the image still selected go to Edit | Copy. Now select background image
and Edit | Paste | As New Selection.
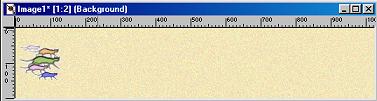
Your second image is now added to the background. Simply position it where you want it to be and you now have 2 images combined into one.
![]()